
Last updated: September 12, 2026
Key Takeaways
- For fire sprinkler work, the usual standard reference is NFPA 13, and that is not a DIY category.
- Run every station individually for 2 to 5 minutes during testing.
- A larger install can take 1 to 3 days, longer if the yard is compacted, rocky, or landscaped.
- The parts are simple on paper, but the details decide whether the system works for 10 years or becomes a leak-prone mess in 10 months.
Table of Contents
- What a sprinkler system is, and who this article is for
- What are the main parts of a sprinkler system?
- How does a sprinkler system work?
- Why are there different zones on a sprinkler system?
- What should I ask before hiring someone to install or repair it?
- When should I stop and call for qualified help?
- Common sprinkler mistakes that cost money later
A sprinkler system is a network of pipes, valves, heads, and controls that sends water where it belongs in a yard, landscape, or building, then releases it in a measured pattern. Who’s this for? If you are sorting through bids, trying to choose a contractor, or just figuring out whether a repair quote makes sense, the real issue is not only “what is it?” but also “what can fail, what should be included, and what does fixing it usually cost?” This article explains what is a sprinkler system, its parts, zones, and how it works.
What a sprinkler system is, and who this article is for
A sprinkler system is a water distribution setup with separate watering areas, called zones: one controller turns each zone on and off through valves, and each zone feeds a group of sprinkler heads or drip lines. I wrote this for a homeowner, property manager, or small business owner who needs enough background to hire the right contractor, compare estimates, or catch a sloppy job before it gets expensive.
You should already know a few basics about the property: where the meter or main shutoff is, whether the system is for lawn irrigation or fire protection, and whether you need new installation, repair, or replacement. I am not treating every sprinkler system as the same thing, because it isn’t; if the work involves fire protection or a mixed-use site, consult a qualified professional and verify the applicable standard or local code before moving ahead. A lawn irrigation system, a commercial landscape system, and a fire sprinkler system serve different purposes and are governed by different standards. For fire sprinkler work, the usual standard reference is NFPA 13, and that is not a DIY category; for a general overview of fire sprinkler standards, see NFPA’s code page at https://www.nfpa.org/codes-and-standards.
For landscape irrigation, a decent local contractor should be able to talk through pipe size, zone count, water pressure, backflow protection, and controller setup without hand-waving. Can’t do that? Red flag. A small residential repair may take a few hours, while a full install usually runs 1 to 3 days; trenching, soil, and zone count all affect that. Hard clay, rock, roots, steep grades, and long runs can make the labor snowball fast.
A sprinkler system is not “just heads in the ground.” It is a pressure-balanced layout. The design has to fit the water supply, or the heads at the far end limp along while the near ones blast water into the sidewalk. Ugly, honestly. That is the difference between even watering and daily waste.
What are the main parts of a sprinkler system?
A sprinkler system is built from a controller, valves, piping, heads or emitters, and protection devices such as a backflow preventer. Simple list. Harder reality. The parts look straightforward on paper, but the details decide whether the system works for 10 years or turns into a leak-prone mess in 10 months.
The controller is the timer. It opens each zone on a schedule and can usually be adjusted by season. A basic unit may have 4, 6, 8, or more stations. A station is a valve-controlled zone. If a property has 7 distinct watering areas, a 4-station controller will not be enough without expansion.
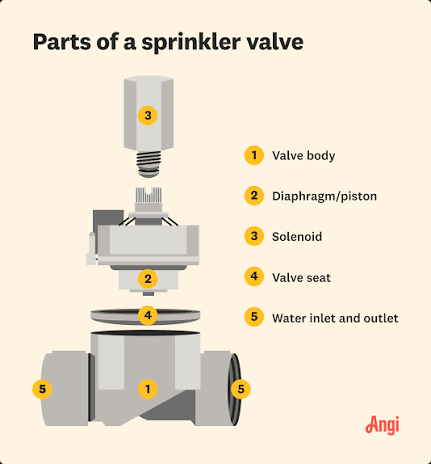
The valves sit between the water supply and each zone. Think of one as an electrically operated gate. When the controller sends a signal, the valve opens and lets water into that zone. A bad valve usually shows up as a zone that never shuts off, never starts, or leaks through when it should be closed.
The mainline carries pressurized water from the supply to the valves. The lateral lines run from each valve to the sprinkler heads. Pipe size matters. Residential irrigation often uses 3/4-inch or 1-inch pipe in the field, but the right size depends on flow and pressure, not habit.
The sprinkler heads are the visible part. They can be fixed spray heads, rotary heads, or rotor heads. Spray heads throw water in a shorter arc and are common for tight spaces. Rotors throw farther and fit larger turf areas. Drip zones use emitters rather than pop-up heads.
A backflow preventer keeps irrigation water from flowing backward into the drinking water supply. In many places it is required by code, and for good reason. If a contractor skips it or installs it wrong, that is not a small detail.
The wiring connects the controller to the valves through low-voltage cable. One common failure is a nicked wire buried in a trench, which can make a zone dead or intermittent. A proper job also includes a clean shutoff, accessible valve box, and labels for the zones. If I walked a property and found buried valves, unlabeled wires, or spray heads of mixed types on one zone, I would expect service trouble. That sort of mess is a gremlin in the works.
How does a sprinkler system work?
A sprinkler system works by splitting the property into zones so the available water pressure and flow are not overloaded. The controller energizes one valve at a time, water moves through the piping, and the heads on that zone deliver a matched pattern for a set number of minutes.
It starts at the water source. That may be a municipal supply or, less commonly, a pump-fed source. Water enters the mainline and passes through a shutoff and backflow device. From there it reaches the zone valves. Each valve opens only when the controller sends power to that station.
The big idea is that zones are designed around flow rate and pressure. Flow rate is how much water moves, often measured in gallons per minute. Pressure is the force behind it, usually measured in pounds per square inch, or psi. A zone with six spray heads has a very different demand than a zone with three rotary heads or a long drip run. If a contractor ignores that and just counts heads, the system may still run, but the watering will be lopsided.
Here’s the order I would expect on a proper install or diagnostic visit:
- Confirm the supply. Measure or verify static pressure and available flow at the source. A common residential irrigation target is often in the 30 to 50 psi range at the head, but the design must fit the site, not a slogan. If pressure drops sharply when a zone starts, the system may be undersized or restricted.
- Map the watering areas. Separate turf, shrubs, slopes, narrow strips, and drip beds into different zones. Verify that each zone has a similar watering need. Mixed needs on one zone are a sign of bad design.
- Size the zones by flow, not by guess. Group heads so the total demand stays within the available supply. If a zone has too many heads, the farthest one will underperform first.
- Lay the pipe runs. Keep trench depth and routing consistent with local practice and freeze risk. Verify that pipe is not kinked, crushed, or laid over sharp rock. A bad trench often causes the first leak months later.
- Install the valves and label them. Put them in an accessible box and mark each station. Verify that manual operation works and that each valve closes fully. A valve that seeps when off wastes water every cycle.
- Set head type and nozzle. Match the throw distance and precipitation rate to the area. Verify head-to-head coverage where needed, so spray from one head reaches the next. Dry spots between heads mean poor spacing or the wrong nozzle.
- Wire the controller and test each zone. Run every station individually for 2 to 5 minutes during testing. Verify start-up, coverage, and shutoff. Watch for misting, runoff, overspray onto pavement, or a zone that cycles on and off.
- Adjust schedule and seasonal runtime. Set run times by zone type, soil, and sun exposure. If a contractor leaves every zone at the same duration, that is lazy setup. Lawn and shrub beds rarely need the same schedule.
A system that works well should wet the intended area evenly, shut off cleanly, and avoid pooling or spray onto hard surfaces. If the heads barely pop up, the schedule is wrong, the pressure is low, or there is a clog. If water shoots in a fine mist, pressure may be too high or the nozzles wrong. Good work shows up in the spray pattern before it shows up on the invoice.
Why are there different zones on a sprinkler system?
Zones exist because one water supply usually cannot run every part of a property at the same time without losing pressure or wasting water. A zone is one controlled watering area, and dividing a property into 4 to 12 zones is common on residential jobs, though the right number depends on size and layout.
The basic rule is simple: group plants with similar water needs and similar coverage requirements. Turf usually needs a different setup than shrub beds. A shady side yard should not share a zone with a hot south-facing strip if the contractor can avoid it. Slopes need shorter run times to reduce runoff. Drip irrigation often belongs on its own zone because it runs at a different pressure and flow than pop-up heads.
A bad zone layout creates the problems people blame on “sprinklers” in general. Some areas get soggy, others stay brown, and the controller keeps running longer to compensate. That just burns more water. I’d be cautious about any estimate that treats zone count as a side note; if you are comparing bids, ask a qualified irrigation professional to explain how the zone count matches the property’s pressure, flow, and planting needs. Adding a zone later means trenching, wiring, and sometimes revising the controller or valve manifold.
Edge cases matter here. A long, narrow side yard may need rotor heads even if the rest of the property uses sprays. A corner lot with two pressure conditions may need pressure-regulating heads or a separate valve grouping. In colder regions, systems may also need drain-down or blowout provisions, and winterization changes the way zones are arranged. In areas with hard water or sediment, strainers and serviceable filters become more important, especially on drip zones.
This is also where a system can be the wrong fit. If your water supply is weak, your lot is small, and your planting is mostly drought-tolerant beds, a full multi-zone sprinkler layout may be more machinery than you need. In that case, fewer zones and more drip can be the cleaner answer.
What should I ask before hiring someone to install or repair it?
Ask how the contractor plans the zones, what pressure and flow they are designing for, and what will be included in the price. Those questions tell you whether you are talking to someone who understands irrigation or someone guessing from a catalog.
I would ask for these specifics:
– How many zones do you expect, and why?
– What is the available pressure and flow at the property?
– Will you install a backflow preventer, and where will it go?
– Are the heads matched to the area and the pipe size?
– Will the controller be seasonal or smart-capable, and how will it be programmed?
– Is trenching, valve box placement, and cleanup included?
– What happens if the design changes after the water test?
Price varies widely by region, site access, and whether the work is repair, partial retrofit, or full install. A simple head replacement may be a modest service call; a full system with trenching, backflow, controller, and several zones is a bigger project. If a quote is unusually low, I would look for exclusions: no controller programming, no backflow, shallow trenching, or a vague “materials extra” line. A fair estimate should explain what affects the price, not hide behind a lump sum.
Time matters too. A small repair might take under an hour once the problem is found. A larger install can take 1 to 3 days, longer if the yard is compacted, rocky, or landscaped. A good contractor should tell you when access, weather, or utility marking could slow the job.
A written scope should mention pipe type, head type, zone count, and testing. If it does not, the risk is not only cost. It is a system that looks done and then fails the first season.
When should I stop and call for qualified help?
Stop and call for qualified help when the job involves the water supply, electrical control, or fire protection. Irrigation is not the place to improvise around pressure, backflow, or code requirements.
No backflow protection is planned: This means the system could contaminate the potable water line — do not move forward until the correct device is specified and installed to local code.
Pressure or flow is unknown: This means the zone layout may be wrong from the start — have the supply measured before buying parts or approving a design.
The issue is inside a wall, slab, or main service line: This can turn a repair into plumbing work — stop and bring in the right trade.
There are repeated electrical faults at the controller: This suggests a short, damaged wire, or failed valve solenoid — do not keep resetting it; the fault needs diagnosis.
The system is for fire protection, not landscape watering: This falls under different standards and inspection rules — do not treat it like a lawn sprinkler job; consult a qualified fire protection professional and the applicable code before work begins.
Water is pooling near foundations or walkways: The layout or schedule is wrong and may be causing damage — pause use and correct the design before more water runs.
A bad DIY or low-bid job often looks “finished” but leaves clues: spray hitting siding, heads buried too low, zones that overlap poorly, muddy corners, and a controller nobody can label. If you see those signs, the fix is usually not another tweak to runtime. It is a correction to design or installation.
Common sprinkler mistakes that cost money later
The most expensive sprinkler mistakes come from trying to make one zone do the work of three. A system that is wrong at the design stage tends to stay wrong until someone opens the trench again.
- Mixing spray heads and rotors on the same zone. Spray heads and rotors apply water at different rates. The result is either puddling or dry spots. The correct alternative is to separate them into different zones.
- Ignoring head-to-head coverage. If one head cannot reach the next, dry bands appear between spray patterns. The fix is to adjust spacing, nozzle choice, or head type.
- Installing too many heads on one valve. This lowers pressure at the far end of the zone and causes weak coverage. The correct alternative is to split the area into another zone or reduce demand.
- Leaving the controller on one schedule for every area. Lawn, shade bed, full sun, and drip do not drink at the same rate. The better approach is zone-specific runtime, often with seasonal adjustment every 4 to 8